Rotate Rings Level 16 Walkthrough
BeginnerRotate Rings Level 16 solution: 11 turns around a six-clamp hub. Turn the upper-left blue ring first.

Level board
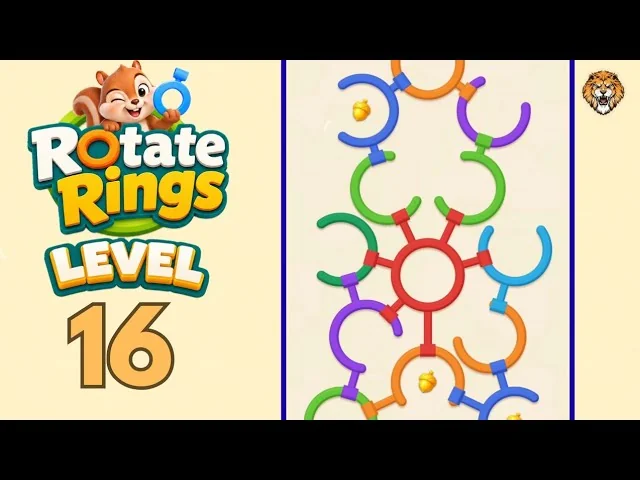
Step-by-step walkthrough
Prefer text to video? Every turn is below in order — which ring to turn, which way, roughly how far, and whose clamp it is clearing. Keep it open next to the game and work down the list.
Level 16 · Beginner · 11 turns around one central hub. This is a text-only solve. The central red ring is a closed carrier with six clamps; every other turn removes one of them.
The centre is a red closed ring with six clamps reaching out in different directions. Each outer ring is held by one of those clamps, and some of them also carry a neighbour. The red hub never turns: clear the rings around it one at a time, and it drops with the last one.
How the rings work
- A turning ring has a gap. A clamp presses on its rim, and the ring comes free when the gap reaches that clamp.
- The central red ring is a closed circle with no gap. It is a carrier, not a turning piece; do not try to rotate it early.
- Six clamps radiate from the red hub. Each one holds a different outer ring, so the board is solved by clearing those six directions.
- The clamp positions shift as the rings turn. Read the actual gap-to-clamp alignment on screen rather than trusting a fixed clock position.
- Some turns take a second ring with them. The eleven steps are clicks, not the number of rings that fall.
The board at a glance
| Ring | Where | Action | What comes free |
|---|---|---|---|
| Blue | Upper left | Turn — step 1 | Top orange ring |
| Purple | Upper right | Turn — step 2 | Upper-right edge |
| Light green | Upper right | Turn — step 3 | Upper-right side |
| Light green | Upper left | Turn — step 4 | Upper-left side |
| Light blue | Upper right | Turn — step 5 | Upper-right inner ring |
| Orange | Lower right | Turn — step 6 | Lower-right edge |
| Blue | Lower right | Turn — step 7 | Lower-right inner ring |
| Orange | Below | Turn — step 8 | Bottom edge |
| Light green | Lower left | Turn — step 9 | Lower-left side |
| Purple | Lower left | Turn — step 10 | Lower-left inner ring |
| Dark green | Middle left | Turn — step 11 | Central red carrier |
Turn order
Step 1 — Blue ring, upper left
- Action: turn the blue ring at the upper left until its gap reaches the clamp from the central red ring.
- Why: it is the outer ring on that arm of the hub.
- After this: the blue ring comes free, and the orange ring at the top drops with it.
Step 2 — Purple ring, upper right
- Action: turn the purple ring at the upper right until its gap meets the red ring's clamp.
- Why: the upper-right arm is the next exposed group.
- After this: the purple ring drops.
Step 3 — Light green ring, upper right
- Action: turn the light green ring at the upper right until its gap reaches its clamp.
- Why: the purple ring that was beside it is gone.
- After this: the light green ring drops.
Step 4 — Light green ring, upper left
- Action: turn the light green ring at the upper left until its gap meets the red ring's clamp.
- Why: it is the other light green ring, on the opposite side of the top edge.
- After this: the light green ring drops.
Step 5 — Light blue ring, upper right
- Action: turn the light blue ring at the upper right until its gap reaches its clamp.
- Why: it is the last ring on the upper-right side before the lower half.
- After this: the light blue ring drops.
Step 6 — Orange ring, lower right
- Action: turn the orange ring at the lower right until its gap meets its clamp.
- Why: it is the outer ring on the lower-right arm.
- After this: the orange ring drops.
Step 7 — Blue ring, lower right
- Action: turn the blue ring at the lower right until its gap reaches the red ring's clamp.
- Why: the orange ring above it has already left.
- After this: the blue ring drops.
Step 8 — Orange ring, below
- Action: turn the orange ring below the hub until its gap meets its clamp.
- Why: it is the last outer ring on the bottom edge.
- After this: the orange ring drops.
Step 9 — Light green ring, lower left
- Action: turn the light green ring at the lower left until its gap reaches its clamp.
- Why: the lower-left side is the last outer group.
- After this: the light green ring drops.
Step 10 — Purple ring, lower left
- Action: turn the purple ring at the lower left until its gap meets the red ring's clamp.
- Why: it sits inside the light green ring that has just left.
- After this: the purple ring drops.
Step 11 — Dark green ring, middle left
- Action: turn the dark green ring at the middle left until its gap reaches the final clamp.
- Why: it is the last turning ring still attached to the red hub.
- After this: the dark green ring comes free, and the central red carrier drops with it, clearing the level.
Pro tips
- The red ring is the hub, not a move. It has no gap and never turns. Every step is about emptying one of its six clamps.
- Step 1 is a double drop. The upper-left blue ring takes the top orange ring with it, so there is no separate orange step.
- Expect the clamp angles to move. Earlier rings rotate the pieces around them; align the gap with the clamp you can see rather than a remembered position.
- The last turn takes the hub. When the lower-left dark green ring leaves at step 11, the red ring has no clamps left and falls with it.
Level 16 in short
Clear the upper-left blue ring, the upper-right purple and light green rings, the upper-left light green ring, the upper-right light blue ring, then the lower-right orange and blue rings. Finish the bottom orange, lower-left light green and purple rings; the last dark green ring takes the red hub down.
More beginner walkthroughs
View all →
Featured walkthroughs
The levels players search for most - each with a full video guide.