Rotate Rings Level 5 Walkthrough
BeginnerRotate Rings Level 5 solution: 7 rings and 8 turns. Turn the light blue ring (upper left) first — clockwise about 105°.
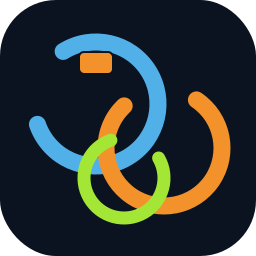
Video walkthrough
Shared recording: this upload covers Levels 1-10. If the uploader added chapters or timestamps, use the video description to jump to Level 5.
Player not loading? Watch on YouTube.
Solution, numbered in order
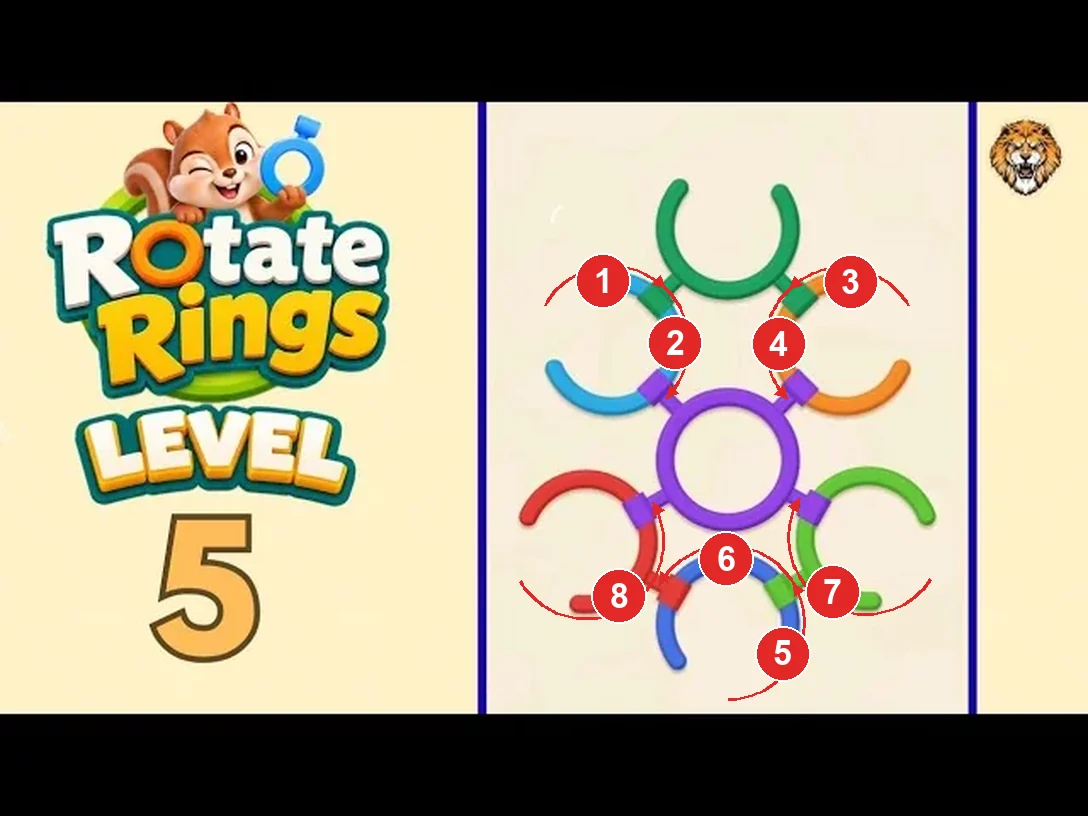
Numbers mark the turn order; the arc beside a ring shows which way it turns. Measured from the board image, last checked 2026-10-17.
Step-by-step walkthrough
Prefer text to video? Every turn is below in order — which ring to turn, which way, roughly how far, and whose clamp it is clearing. Keep it open next to the game and work down the list.
Level 5 · Beginner · 7 rings, 8 clamps, 8 turns. Gap angles and clamp owners were measured from the level's own board picture, and the numbered image on this page uses the same numbers.
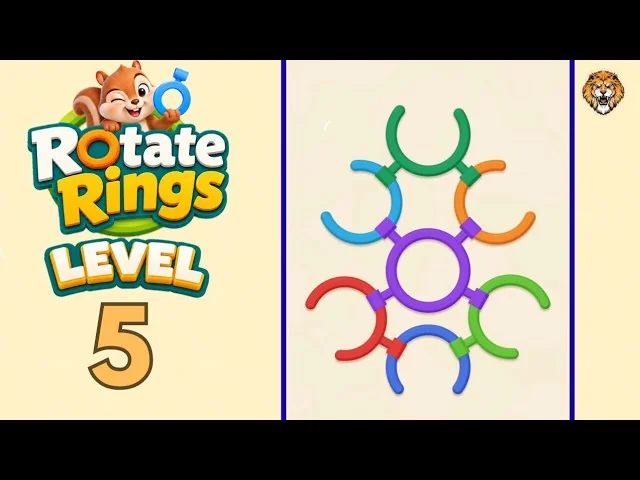
A flower of rings around one hub. Every outer ring is clamped to the ring beside it, and four of them are clamped to the hub in the middle. The hub itself is a closed ring, so it never has to turn: clear the outer rings one by one and the flower falls apart.
How the rings work
- Every ring is a circle with a gap cut out of it. Two rings that touch are joined by a clamp: a small coloured block on a short neck, and the block presses down on the rim of the ring it holds.
- The block is the colour of the ring that owns it, and the neck runs back to that ring. So you never have to guess which ring a clamp belongs to — look at the colour of the block.
- A held ring comes free by turning until its gap reaches the clamp. The clamp does not move; the gap travels to it.
- A ring held by more than one clamp needs one turn per clamp. Nobody here turns more than twice, but that is still why the level takes 8 turns rather than 7.
- Work from the outside in. Start with the rings that hold nobody, so that by the time you need a clamp its owner ring has not moved yet and the clamp is still where the picture says it is.
- A ring drawn as a closed circle has no gap at all. It can only hold others, and it is never turned.
The board at a glance
| Ring | Where | Gap | Held by | Turns needed |
|---|---|---|---|---|
| Dark green | Above | 86° gap | — nothing holds it | never — owner only |
| Light blue | Upper left | 88° gap | Dark green (above), Purple (below) | 2 |
| Orange | Upper right | 86° gap | Dark green (above), Purple (below) | 2 |
| Purple | Below | closed circle | — nothing holds it | never — owner only |
| Light green | Lower right | 86° gap | Purple (below) | 1 |
| Red | Lower left | 86° gap | Purple (below) | 1 |
| Blue | Below | 86° gap | Light green (lower right), Red (lower left) | 2 |
How to read the numbered picture
- The red numbers are the turn order, and each number is drawn on the ring that turns at that step.
- The thin arc and arrow on the outside of a ring show which way it turns; the length of the arc is roughly how far.
- When one ring has to turn twice, its two numbers can crowd together. A short line points each number back at the ring it belongs to.
- The angles say where the gap has to end up. In game you do not need to be exact — stop turning as soon as the ring slips out of the clamp.
Turn order
Step 1 — Light blue ring, upper left
- Turn: clockwise about 105°.
- Why: the clamp holding it belongs to the dark green ring to the upper right.
- After this turn: it separates from the dark green ring to the upper right. This ring is still clamped elsewhere, so it comes back at step 2.
Step 2 — Light blue ring, upper left
- Turn: clockwise about 90°.
- Why: the clamp holding it belongs to the purple ring to the lower right.
- After this turn: it separates from the purple ring to the lower right, which was its last clamp — this ring is free.
Step 3 — Orange ring, upper right
- Turn: anticlockwise about 105°.
- Why: the clamp holding it belongs to the dark green ring to the upper left.
- After this turn: it separates from the dark green ring to the upper left. This ring is still clamped elsewhere, so it comes back at step 4.
Step 4 — Orange ring, upper right
- Turn: anticlockwise about 90°.
- Why: the clamp holding it belongs to the purple ring to the lower left.
- After this turn: it separates from the purple ring to the lower left, which was its last clamp — this ring is free.
Step 5 — Blue ring, below
- Turn: anticlockwise about 120°.
- Why: the clamp holding it belongs to the light green ring to the upper right.
- After this turn: it separates from the light green ring to the upper right. This ring is still clamped elsewhere, so it comes back at step 6.
Step 6 — Blue ring, below
- Turn: anticlockwise about 120°.
- Why: the clamp holding it belongs to the red ring to the upper left.
- After this turn: it separates from the red ring to the upper left, which was its last clamp — this ring is free.
Step 7 — Light green ring, lower right
- Turn: clockwise about 175°.
- Why: the clamp holding it belongs to the purple ring to the upper left.
- After this turn: it separates from the purple ring to the upper left, which was its last clamp — this ring is free.
Step 8 — Red ring, lower left
- Turn: anticlockwise about 180°.
- Why: the clamp holding it belongs to the purple ring to the upper right.
- After this turn: it separates from the purple ring to the upper right, which was its last clamp — this ring is free.
Pro tips
- The light blue ring is the one that works hardest. It turns twice (upper left), once for each clamp pressing on it. Clear it before any ring it holds, or one of those clamps will have moved by the time you need it. The orange ring (upper right) also goes twice.
- Do not try to turn the closed ring. The purple ring (below) is drawn as a complete circle with no gap, so it only holds the rings beside it and never has to move itself.
- The turns run from 90° to 180°. The smaller ones are the ones to take slowly: at 90° the gap lands on the clamp almost immediately, and it is easy to overshoot and carry it past.
- The direction is not the same all the way through. Step 2 goes clockwise and step 3 goes anticlockwise — and it swaps back again further down, so read the arrow beside each red number instead of assuming the ring keeps spinning the same way.
Level 5 in short
Every outer ring ends up loose and the hub is left on its own, which clears the board.
If the board still will not open, the ring you are turning is probably not the one that is stuck — the clamps on a ring always give way in the order above, one at a time. Watch the video on this page for the same sequence played out at full speed, or take the next level from the links below.
Rotate Rings Level 5 — frequently asked questions
- How many moves does Level 5 take?
- 8 turns — one for every clamp. Every outer ring ends up loose and the hub is left on its own, which clears the board.
- Which ring do I turn first in Level 5?
- Start with the light blue ring: turn it clockwise about 105°, which brings its gap onto the clamp holding it.
- Why can't I turn some of the rings in Level 5?
- Some rings on this board are closed circles with no gap. They are never turned — they only hold the rings next to them, and they are what the rest of the board is solved around.
- Is there a video walkthrough for Level 5?
- Yes — the walkthrough video on this page covers this board. The annotated picture next to it numbers the turns in the order they have to happen.
More beginner walkthroughs
View all →
Featured walkthroughs
The levels players search for most - each with a full video guide.