Rotate Rings Level 7 Walkthrough
BeginnerRotate Rings Level 7 solution: 2 long folding bars and 8 actions. Turn the top purple ring first, then pull the upper-right red bar.

Video walkthrough
Shared recording: this upload covers Levels 1-10. If the uploader added chapters or timestamps, use the video description to jump to Level 7.
Player not loading? Watch on YouTube.
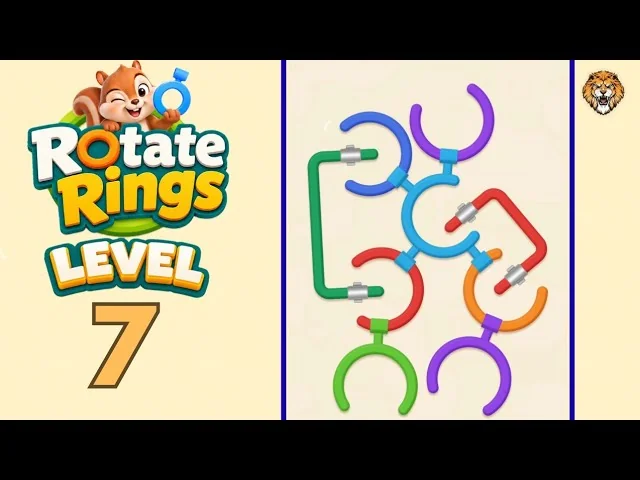
Level board
Step-by-step walkthrough
Prefer text to video? Every turn is below in order — which ring to turn, which way, roughly how far, and whose clamp it is clearing. Keep it open next to the game and work down the list.
Level 7 · Beginner · 2 long folding bars, 8 actions. This is a text-only solve. The two bars are pulled along their silver sleeves; the rings are turned until their gaps meet a clamp.
The board is built in layers. A long green bar runs down the left side, a red bar crosses the upper right, and a group of rings is packed around the central light blue ring. The bars hold several of those rings in place, so the order matters more than the size of any single turn.
How the pieces work
- A ring is a circle with a gap. A clamp from a neighbouring piece presses on its rim. Turn the held ring until the gap reaches that clamp.
- A long folding bar passes through silver sleeves. Pull it lengthwise along the sleeves. Do not swing it around the board.
- Bars can hold more than one ring at once. When a bar leaves, every ring it was pressing on becomes loose at the same time.
- Work from the outside in. Clear the top and right edges first, then the long left bar, then the centre.
- Some rings share a clamp. Freeing one can take a second ring with it, which is why eight actions clear more than eight pieces.
The board at a glance
| Piece | Where | Type | Action | What comes free |
|---|---|---|---|---|
| Purple ring | Top | Gap ring | Turn — step 1 | Top edge |
| Red bar | Upper right | Long folding bar | Pull — step 2 | Upper-right orange link |
| Purple ring | Lower right | Gap ring | Turn — step 3 | Right side |
| Orange ring | Right | Gap ring | Turn — step 4 | Right edge |
| Green bar | Left | Long folding bar | Pull — step 5 | Left and centre links |
| Blue ring | Upper left | Gap ring | Turn — step 6 | Upper-left side |
| Green ring | Bottom | Gap ring | Turn — step 7 | Bottom edge |
| Light blue ring | Centre | Gap ring | Turn — step 8 | Centre ring and lower red ring |
Solution order
Step 1 — Turn the top purple ring
- Action: turn the purple ring at the very top until its gap reaches its clamp.
- Why: it is an outer piece and holds nothing below it.
- After this: the purple ring drops and the top edge opens.
Step 2 — Pull the upper-right red bar
- Action: pull the red bar at the upper right out along its silver sleeve.
- Why: the bar presses on the orange ring below it, so the orange ring cannot be turned while the bar is in place.
- After this: the red bar leaves and the upper-right link loosens.
Step 3 — Turn the lower-right purple ring
- Action: turn the lower-right purple ring until its gap meets the clamp holding it.
- Why: the right side is now exposed and this ring is the next piece in the chain.
- After this: the purple ring comes free.
Step 4 — Turn the right-hand orange ring
- Action: turn the orange ring on the right until its gap reaches its clamp.
- Why: the red bar that crossed it is already gone, so it can finally rotate.
- After this: the orange ring drops and the right edge is clear.
Step 5 — Pull the long green bar on the left
- Action: pull the long green bar out along both of its silver sleeves.
- Why: it runs past the left and centre rings and blocks several links at once.
- After this: the bar leaves and the left and centre connections open.
Step 6 — Turn the upper-left blue ring
- Action: turn the blue ring at the upper left until its gap reaches its clamp.
- Why: the long green bar is no longer pressing on it.
- After this: the blue ring comes free.
Step 7 — Turn the bottom green ring
- Action: turn the green ring at the bottom until its gap meets its clamp.
- Why: it is the last outer ring on the lower half.
- After this: the green ring drops. Only the central light blue ring and the lower red ring are still linked.
Step 8 — Turn the central light blue ring
- Action: turn the central light blue ring until its gap reaches the final clamp.
- Why: every piece holding it from the outside has now been cleared.
- After this: the central ring comes free and the lower red ring drops with it, clearing the level.
Pro tips
- Do the two bars at the right moments. The red bar has to go before the orange ring can turn at step 4, and the long green bar has to go before the upper-left blue ring can turn at step 6.
- Do not pull the long bar halfway. The left green bar passes through two sleeves, so pull it clear along its full length instead of wiggling one end.
- Keep the lower red ring for last. It is carried by the central light blue ring, so there is no separate move for it.
- The board is layered, not circular. If a ring will not turn, look for a bar or a ring outside it that is still pressing on the same link.
Level 7 in short
Clear the top purple ring and the red bar, work down the right side, pull the long green bar, then finish the left and bottom. The central light blue ring is the last turn and takes the lower red ring with it.
More beginner walkthroughs
View all →
Featured walkthroughs
The levels players search for most - each with a full video guide.